I recently have been trying to get various Compact Flash cards to work with a Vulcan Gold controller. I do have other more modern storage devices for the GS, but I like the idea of still being able to use a Vulcan Controller :), especially as the real HD will die soon..in fact one of my drives has already. Anyway…
Initially I purchased quite a few smaller CF cards to try and get things to format/partition correctly, but with very little luck. In the end I used a great little utility written by Derek Taubert that partitions the CF cards specifically for use on a Vulcan controller. See the utility here:-
As I don’t have any physical machines running Linux I just used a Live CD of Ubuntu Desktop on a spare laptop I had. When compiling (via GCC) the code I did receive a Warning message around implicit declaration of function, but this didn’t effect the use of the tool at all, so can be ignored

Once this is done I booted up Part Manager (2.0.4) on my GS. When running the tool I did initial have some issues with it. If you don’t do things in the right way the tool can crash out. Also I only seemed to have the modify option. After some trial and error here are the following steps I used to get the CF seen by GS/OS successfully :).
Step 1
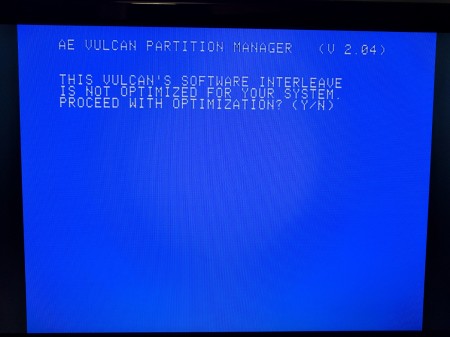
On running Part Manager select N to optimisations. Don’t be tempted to say Yes as it will just hang :).
Step 2
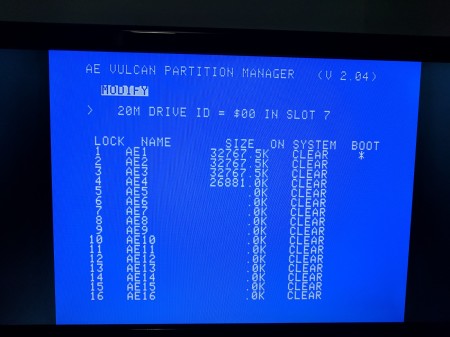
Hit Modify (For some reason I had no other options shown)
Step 3
Use the right arrow and select system and hit enter. Then use the right arrow to select PRODOS. Hit Enter to leave the field. Do the other partitions.
Use left arrow and move to the ON column and hit Enter. Use the down arrow and do the same for the other partitions.
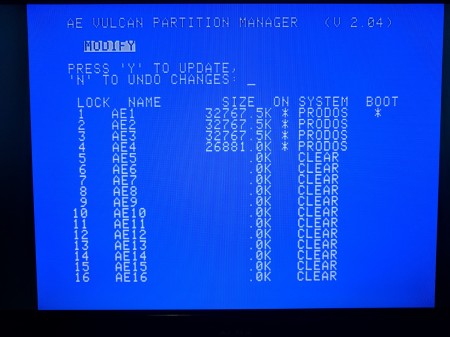
Hit ESC to end changes and select Y to Update.
Step 4
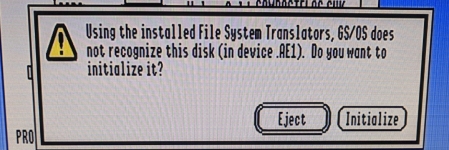
As I didn’t have an exit option I just reset the GS and used an existing GS/OS disk to format the drives. You will automatically get prompted to format the new partitions :).


 Posted by drewbiegs


